Instabase Installer guide
This guide walks you through installing Instabase using the Instabase Installer. Before continuing, you must complete the steps outlined in the Installation guide in the deployment package. This Instabase Installer guide continues from the final step in the step-by-step section of the Installation guide.
Prerequisites
You need the following tools and information for the installation:
-
An internet browser, preferably Google Chrome. Firefox and Microsoft Edge are also supported.
-
Your Deployment Manager admin account credentials. If you did not receive the credentials from Instabase directly, follow these instructions.
-
Your database, file storage system, and Kubernetes information. Specific information requirements are listed in the relevant section of this guide.
-
The
installation.zipfile for the release, which includes your base configurations in thebase_configs.zipfile and default patches in thedefault_patches.zipfile. -
Your Instabase license file. This file is provided by your customer success manager and has an .iblicense format.
-
(Optional) A .zip file containing any network policies to apply during installation. If indicated, your
installation.zippackage includes a folder callednetwork-policiescontaining a series of network policy files. After making any necessary changes to the network policy files, compress thenetwork-policiesfolder. -
(Optional) Any additional patches to apply during installation. The
default_patches.zipfile contains all required patches that must be applied during installation. However, any new patches you want to apply during installation must be added alongside the contents of thedefault_patches.zipfile:-
Unzip the
installation.zipfile. -
Unzip the
default_patches.zipfile contained within the now unzippedinstallationfolder. -
Add any new custom patch files to the now unzipped
default_patchesfolder. -
Select all files in the
default_patchesfolder and compress them, creating a new .zip file of patches. You can rename the .zip file, but there are no file name requirements. This new .zip file is what you upload during the Upload platform configurations step.InfoYou can also apply patches after completing installation, from the Deployment Manager Configs tab. This process applies only if you have additional custom patches that must be applied during installation.
-
-
(Optional) If configuring single sign-on for your deployment, the app registration details for your security assertion markup language (SAML) connection. See the SAML authentication documentation for details. You can also configure a SAML connection after installation.
Accessing your Deployment Manager admin credentials
Your Deployment Manager admin credentials are encoded within the control-plane.yml file in the Instabase base configurations .zip file. You can decode the username and password values using the command line:
-
To get the username, run the following command:
kubectl -n $IB_NS get secret/control-plane-metadata --template={{.data.username}} | base64 -d -
To get the password, run the following command:
kubectl -n $IB_NS get secret/control-plane-metadata --template={{.data.password}} | base64 -d
Step 1: Log in to Deployment Manager
After configuring access to Deployment Manager (see step 9 in the Installation guide for instructions), log in to access the Instabase Installer.
-
At the Deployment Manager login screen, log in with your Deployment Manager admin credentials. Deployment Manager redirects you to Instabase Installer.
-
Click Start on the Instabase Installer Welcome tab.
Step 2: Configure database settings
The Database tab is where you select the relational database type and enter credentials and other connection parameters. The database contains all the metadata needed to run Instabase. This includes information for user accounts, repositories, organizations, access control, Marketplace solutions, and more.
Instabase Installer supports connecting to the following databases:
The steps listed in this section walk you through setting up a standard database connection. Refer to the setting description tables to understand when you might use any optional settings not included in these steps.
Connect to MySQL
When connecting to a MySQL database, you see the following settings:
| Setting | Required | Value |
|---|---|---|
| Database Name | Required | Your database name. |
| Username | Required | The database username. |
| Password | Required | The database password. |
| Database Hostname | Required | The server host or hostname. |
| Database Port | Required | The port value. The common, default MySQL database port value is 3306. If you have a custom port value, use it here. |
| Enable TLS | Optional | Turn on to use TLS certificate-based authentication. While this setting is optional, it is strongly recommended to enable TLS in production environments to reduce security risks. Note
Instabase supports certificates from internal and external trusted certificate authorities (CAs). Instabase does not support self-signed TLS certificates.
|
| Certificate Hostname | Optional | Displays when the Enable TLS toggle is turned on. Use this field if the certificate subject’s common name (CN) does not match the hostname (the value in the Database Hostname field). Enter the cert subject’s common name. |
| Skip Verification | Optional | Displays when the Enable TLS toggle is turned on. Enable to skip validating if the certificate is valid. Enabling this setting presents a significant security risk and should be used only for testing and debugging purposes, such as if you need to establish if the certificate is working as intended. |
| Root Certificate | Optional | Displays when the Enable TLS toggle is turned on. Upload the root CA file. This setting is required if using client-side authentication. Supported file types are .crt, .key, .pem, and .cer. |
| Client Certificate | Optional | Displays when the Enable TLS toggle is turned on. Upload the client cert file. This setting is required if using client-side authentication. Supported file types are .crt, .key, .pem, and .cer. |
| Client Key | Optional | Displays when the Enable TLS toggle is turned on. Upload the client key file. This setting is required if using client-side authentication. Supported file types are .crt, .key, .pem, and .cer. |
| Use Manual Database Setup | Optional | Turning on this setting lets you perform manual database setup without passing your database credentials through Instabase Installer. Instead, you create a Kubernetes secret that contains a database connection string with the required parameters. The secret must be a data secret with "db_string" mapping to the database connection string. See the Database Connection String setting description below for information on the correct database connection string format. To learn more about creating Kubernetes secrets, see the Kubernetes Working with Secrets documentation. |
| Database Connection Secret Name | Required if using manual database setup. | Displays when Use Manual Database Setup is turned on. Enter the name of the Kubernetes secret where your database connection string is stored. |
| Advanced | Optional | Turn on to display additional advanced settings. Note
Turning on the Advanced toggle clears your previously configured settings.
|
| Database Connection String | Optional | Displays when the Advanced toggle is turned on. This setting is primarily used for debugging or configuring additional database settings not available in Instabase Installer. The database connection string also overrides any previously configured settings. For a standard installation, you don’t need this setting. To manually define the database connection string, use the following format: INSTABASE_BACKEND_DB_PARAMS = “–username= |
To connect to your MySQL database:
-
In the Database field, select MySQL.
-
In the Database Name field, enter the database name.
-
In the Username field, enter the database username.
-
In the Password field, enter the database password.
-
In the Database Hostname field, enter the host or hostname.
-
In the Database Port field, enter the database port value. If you don’t have a custom port value, enter the MySQL default value of
3306. -
Turn on the Enable TLS toggle.
NoteEnabling TLS is strongly recommended for production environments. Disable TLS only for testing or non-production environments.
-
Click Root Cert and select your root ca file from the file explorer.
-
Click Client Cert and select your client cert file from the file explorer.
-
Click Client Key and select your client key file from the file explorer.
-
Click Next to continue to Step 3.
Connect to PostgreSQL
When connecting to a PostgreSQL database, you see the following settings:
| Setting | Required | Value |
|---|---|---|
| Database Name | Required | Your database name. |
| Username | Required | The user or username. |
| Password | Required | The database password. |
| Database Hostname | Required | The server host or hostname. |
| Database Port | Required | The port value. The common, default PostgreSQL database port value is 5432. If you have a custom port value, use it here. |
| SSL Mode | Required | This setting determines whether or with what priority a secure SSL TCP/IP connection is negotiated with the server. There are six SSL Mode options. The following list is ordered from least secure to most secure: - disable: Try only a non-SSL connection. This option disables all encryption. - allow: First try a non-SSL connection; if that fails, try an SSL connection. - prefer: First try an SSL connection; if that fails, try a non-SSL connection. - require: Try only an SSL connection. If a root CA file is present, verify that the server certificate is issued by a trusted certificate authority (CA). The certificate itself is not verified. - verify-ca: Try only an SSL connection. Verify that the server certificate is issued by a trusted CA. - verify-full: Try only an SSL connection. Verify that the server certificate is issued by a trusted CA and that the requested server hostname matches that in the certificate. The SSL connection fails if the server certificate cannot be verified. In production environments, verify-full is typically the appropriate setting. SSL Mode is ignored for Unix domain socket communication. If PostgreSQL is compiled without SSL support, using options require, verify-ca, or verify-full causes an error, while options allow and prefer are accepted, but libpq doesn’t actually attempt an SSL connection. Info
To learn more about SSL mode options, including a summary of the level of protection provided by each option, see the PostgreSQL SSL Support documentation.
|
| Enable TLS | Optional | Turn on to use TLS certificate-based authentication. While this setting is optional, it is strongly recommended to enable TLS in production environments to reduce security risks. Note
Instabase supports certificates from internal and external trusted certificate authorities (CAs). Instabase does not support self-signed TLS certificates.
|
| Certificate Hostname | Optional | Displays when the Enable TLS toggle is turned on. Use this field if the certificate subject’s common name (CN) does not match the hostname (the value in the Database Hostname field). Enter the cert subject’s common name. |
| Root Certificate | Optional | Displays when the Enable TLS toggle is turned on. Upload the root CA file. This setting is required if using client-side authentication. Supported file types are .crt, .key, .pem, and .cer. |
| Client Certificate | Optional | Displays when the Enable TLS toggle is turned on. Upload the client cert file. This setting is required if using client-side authentication. Supported file types are .crt, .key, .pem, and .cer. |
| Client Key | Optional | Displays when the Enable TLS toggle is turned on. Upload the client key file. This setting is required if using client-side authentication. Supported file types are .crt, .key, .pem, and .cer. |
| Root Certificate Revocation List | Optional | Displays when the Enable TLS toggle is turned on. Upload the root certificate revocation list file. Supported file type is .crl. |
| Use Manual Database Setup | Optional | Turning on this setting lets you perform manual database setup without passing your database credentials through Instabase Installer. Instead, you create a Kubernetes secret that contains a database connection string with the required parameters. The secret must be a data secret with "db_string" mapping to the database connection string. See the Database Connection String setting description below for information on the correct database connection string format. To learn more about creating Kubernetes secrets, see the Kubernetes Working with Secrets documentation. |
| Database Connection Secret Name | Required if using manual database setup. | Displays when Use Manual Database Setup is turned on. Enter the name of the Kubernetes secret where your database connection string is stored. |
| Advanced | Optional | Turn on to display additional advanced settings. Note
Turning on the Advanced toggle clears your previously configured settings.
|
| Database Connection String | Optional | Displays when the Advanced toggle is turned on. This setting is primarily used for debugging or configuring additional database settings not available in Instabase Installer. The database connection string also overrides any previously configured settings. For a standard installation, you don’t need this setting. To manually define the database connection string, use the following format: INSTABASE_BACKEND_DB_PARAMS = “–dialect=postgres –url=postgres:// To add multiple parameters, use &. For example: ?sslmode=require&sslkey=/etc/path/tls.key&sslcert=/etc/path/tls.cert Note
The string supports a full PostgreSQL DSN. You can append other parameters to the end of the string. Refer to the PostgreSQL Database Connection Control documentation for the full list of parameters.
|
To connect to your PostgreSQL database:
-
In the Database field, select PostgreSQL.
-
In the Database Name field, enter the database name.
-
In the Username field, enter the database username.
-
In the Password field, enter the database password.
-
In the Database Hostname field, enter the host or hostname.
-
In the Database Port field, enter the database port value. If you don’t have a custom port value, enter the PostgreSQL default value of
5432. -
In the SSL Mode field, select an SSL mode option. For production environments, verify-full is typically the appropriate setting.
-
Turn on the Enable TLS toggle.
NoteEnabling TLS is strongly recommended for production environments. Disable TLS only for testing or non-production environments.
-
Click Root Cert and select your root ca file from the file explorer.
-
Click Client Cert and select your client cert file from the file explorer.
-
Click Client Key and select your client key file from the file explorer.
-
(Optional) Click Root Certificate Revocation List and select your root certificate revocation list file from the file explorer.
-
Click Next to continue to Step 3.
Connect to Microsoft SQL Server
Instabase supports connecting to Microsoft SQL Server using either username and password credentials or Azure Active Directory (Azure AD) credentials. These options are mutually exclusive.
When connecting to a Microsoft SQL Server database you see the following settings:
| Setting | Required | Value |
|---|---|---|
| Database Name | Required | Your database name. |
| Username | Optional | The SQL Server login ID. |
| Password | Optional | The SQL Server password. |
| Database Hostname | Required | The server host or hostname. |
| Database Port | Required | The port value. The common, default SQL Server database port value is 1433. If you have a custom port value, use it here. Note
This setting is disabled when Azure Active Directory is enabled. To pass a database port value with Azure AD, use the Database Connection Parameters setting.
|
| Database Connection Timeout | Optional | Use to increase the database timeout period. This option is useful when working with high latency or load. The unit is seconds and the default is 15 seconds. This setting is disabled when Azure Active Directory is enabled. |
| Azure Active Directory | Optional | Select to enable using Azure AD for database authentication. When enabled, you must set an Azure tenant ID, Azure client ID, and Azure client secret. You can use either your Azure AD credentials or your SQL Server username and password credentials, not both. |
| Azure Tenant ID | Required if Azure Active Directory is enabled. | Displays when Azure Active Directory is enabled. The tenant ID or directory ID of your app registration. |
| Azure Client ID | Required if Azure Active Directory is enabled. | Displays when Azure Active Directory is enabled. The client ID or application ID for your app registration. |
| Azure Client Secret | Required if Azure Active Directory is enabled. | Displays when Azure Active Directory is enabled. The client secret for your app registration. |
| Database Connection Parameters | Optional | Displays when Azure Active Directory is enabled. You can use this field to add custom connection parameters to the database connection string. These parameters are in addition to any settings configured in the UI. Note
For Deployment Manager 0.5, to pass a database port value along with an Azure AD connection string, you must enter the port value as a connection parameter here.
|
| Enable TLS | Optional | Turn on to use TLS certificate-based authentication. While this setting is optional, it is strongly recommended to enable TLS in production environments to reduce security risks. Note
Instabase supports certificates from internal and external trusted certificate authorities (CAs). Instabase does not support self-signed TLS certificates.
|
| Certificate Hostname | Optional | Displays when Enable TLS is turned on. Use this field if the certificate subject’s common name (CN) does not match the hostname (the value in the Database Hostname field). Enter the cert subject’s common name. |
| Trust Server Certificate | Optional | Displays when Enable TLS is turned on. -False (not selected): The default option, assuming an encryption is specified. When this setting is not selected, the server certificate is checked. -True (selected): The server certificate is not checked. The driver accepts any certificate presented by the server and any hostname in that certificate. In this mode, TLS is susceptible to man-in-the-middle attacks. Use this setting for testing only. |
| Public Key | Optional | Displays when Enable TLS is turned on. The public certificate of the CA that signed the SQL Server certificate. This certificate overrides the Go platform specific CA certificates. Supported file types are .pem, .pfx, .crt, and .cer. |
| Use Manual Database Setup | Optional | Turning on this setting lets you perform manual database setup without passing your database credentials through Instabase Installer. Instead, you create a Kubernetes secret that contains a database connection string with the required parameters. The secret must be a data secret with "db_string" mapping to the database connection string. See the Database Connection String setting description below for information on the correct database connection string format. To learn more about creating Kubernetes secrets, see the Kubernetes Working with Secrets documentation. |
| Database Connection Secret Name | Required if using manual database setup. | Displays when Use Manual Database Setup is turned on. Enter the name of the Kubernetes secret where your database connection string is stored. |
| Advanced | Optional | Turn on to display additional advanced settings. Note
Turning on the Advanced toggle clears your previously configured settings.
|
| Database Connection String | Optional | Displays when the Advanced toggle is turned on. This setting is primarily used for debugging or configuring additional database settings not available in Instabase Installer. The database connection string also overrides any previously configured settings. For a standard installation, you don’t need this setting. An exception is if TLS is enabled and your private key file is password protected; in that case use the string format noted below to pass the password keyword. To manually define the database connection string, use the following format: INSTABASE_BACKEND_DB_PARAMS = “–dialect=sqlserver –url=sqlserver:// If TLS is enabled and your private key file is password protected, you must provide the password keyword using the following format: INSTABASE_BACKEND_DB_PARAMS = “–dialect=sqlserver –url=sqlserver:// If the password keyword contains any commas, enter a second comma in the password string. For example a keyword of a,b,c is written as a,,b,,c in the string. Info
The string supports a full SQL Server DSN. You can append other parameters to the end of the string. Refer to the Microsoft DSN and Connection String Keywords and Attributes documentation for the full list of parameters.
|
Connect with username and password credentials
To connect to your Microsoft SQL Server database with username and password credentials:
-
In the Database field, select SQL Server.
-
In the Database Name field, enter the database name.
-
In the Username field, enter the database username.
-
In the Password field, enter the database password.
-
In the Database Hostname field, enter the host or hostname.
-
In the Database Port field, enter the database port value. If you don’t have a custom port value, enter the default SQL Server database port value of
1433. -
Turn on the Enable TLS toggle.
NoteEnabling TLS is strongly recommended for production environments. Disable TLS only for testing or non-production environments.
-
Click Public Key and select your certificate file from the file explorer.
-
Click Next to continue to Step 3.
Connect with Azure Active Directory credentials
To connect to your Microsoft SQL Server database with Azure Active Directory credentials:
-
In the Database field, select SQL Server.
-
In the Database Name field, enter the database name.
-
In the Database Port field, enter the database port value. If you don’t have a custom port value, enter the default SQL Server database port value of
1433. -
Select the Azure Active Directory option.
-
In the Azure Tenant ID field, enter the tenant ID.
-
In the Azure Client ID field, enter the client ID.
-
In the Azure Client Secret field, enter the client secret.
-
Turn on the Enable TLS toggle.
NoteEnabling TLS is strongly recommended for production environments. Disable TLS only for testing or non-production environments.
-
Click Public Key and select your certificate file from the file explorer.
-
Click Next to continue to Step 3.
Connect to Oracle
When connecting to an Oracle database, you see the following settings:
| Setting | Required | Value |
|---|---|---|
| Database Name | Optional if Use Service Name/SID is turned on, otherwise required. | Your database name. Note
To use the service name or system identifier (SID) as the Oracle database identifier instead, enable the Use Service Name/SID setting.
|
| Username | Required | The database username. |
| Password | Required | The database password. |
| Database Hostname | Required | The server host or hostname. |
| Database Port | Required | The port value. The common, default Oracle port value is 1521. If you have a custom port value, use it here. |
| Use Service Name/SID | Optional | Turn on to use a service name or system identifier (SID) as the database identifier. Enabling this setting disables the Database Name setting, giving you the option to use a service name or SID as the database identifier. |
| Oracle Database Identifier | Required if Use Service Name/SID is turned on, otherwise optional. | Displays when Use Service Name/SID is turned on. Select which database identifier to use: service name or SID. |
| Database service name | Required if Use Service Name/SID is turned on and Service Name is selected as the Oracle Database Identifier, otherwise optional. | The Oracle service name. |
| Database SID | Required if Use Service Name/SID is turned on and SID is selected as the Oracle Database Identifier, otherwise optional. | The Oracle SID. |
| Use Manual Database Setup | Optional | Turning on this setting lets you perform manual database setup without passing database credentials through Instabase Installer. Instead, you create a Kubernetes secret that contains a database connection string with the required parameters. The secret must be a data secret with "db_string" mapping to the database connection string. See the Database Connection String setting description below for information on the correct database connection string format. To learn more about creating Kubernetes secrets, see the Kubernetes Working with Secrets documentation. |
| Database Connection Secret Name | Required if using manual database setup. | Displays when Use Manual Database Setup is turned on. Enter the name of the Kubernetes secret where the database connection string is stored. |
| Advanced | Optional | Turn on to display additional advanced settings. Note
Turning on the Advanced toggle clears your previously configured settings.
|
| Database Connection String | Optional | Displays when the Advanced toggle is turned on. This setting is primarily used for debugging or configuring additional database settings not available in Instabase Installer. The database connection string also overrides any previously configured settings. For a standard installation, you don’t need this setting. To manually define the database connection string, use one of two formats: standard or tnsnames.ora. - Standard: The standard way of connecting to any database is using the following string format: INSTABASE_BACKEND_DB_PARAMS = “–dialect=oci8 –database= - tnsnames.ora: If the database is configured using a tnsnames.ora file, the full tnsnames.ora file can be appended to the connection string as follows: - tsnames.ora string using the SID: INSTABASE_BACKEND_DB_PARAMS = “–dialect=oci8 –database= - tsnames.ora string using the service name: INSTABASE_BACKEND_DB_PARAMS "–dialect=oci8 –database= |
To connect to your Oracle database:
-
In the Database field, select Oracle.
-
Enter the Oracle database identifier, using either a database name, SID, or service name:
- Database name: In the Database Name field, enter the database name.
- SID: Turn on Use Service Name/SID and select SID from the Oracle Database Identifier dropdown. In the SID field, enter the SID.
- Service name: Turn on Use Service Name/SID and select Service Name from the Oracle Database Identifier dropdown. In the Service Name field, enter the service name.
-
In the Username field, enter the database username.
-
In the Password field, enter the database password.
-
In the Database Hostname field, enter the host or hostname.
-
In the Database Port field, enter the database port value. If you don’t have a custom port value, enter the Oracle default value of
1521. -
Click Next to continue to Step 3.
Step 3: Configure file storage settings
The File Storage tab is where you select and configure your file storage system. Instabase Installer supports four file storage options:
Support for Google Cloud Storage is generally available as of release 23.04.
Connect to Amazon S3
When connecting to Amazon S3 for file storage, you see the following settings:
| Setting | Required | Value |
|---|---|---|
| S3 Server URL | Required | The URL of your Amazon S3 instance. The URL should follow this format: https://s3.[your region code].amazonaws.com. Do not include the bucket name in the URL.Examples of valid URLs include https://s3.us-west-2.amazonaws.com and https://s3.us-east-1.amazonaws.com. See the AWS Virtual hosting of buckets documentation for more information. |
| S3 Access Key ID | Optional | Your AWS Identity and Access Management (IAM) key. This setting is optional and is used when you are not using an IAM role to access the S3 bucket in your Kubernetes deployment. |
| S3 Secret Access Key | Required alongside S3 Access Key ID, otherwise optional. | Your AWS IAM secret key. |
| AWS Region | Required | The region code for your AWS account. For example, us-east-2.To see a full list of region codes, see the AWS Regions and zones documentation. |
| S3 Bucket Name | Required | The name of the S3 bucket to use for file storage. |
| S3 Encryption Type | Optional | Select the type of encryption used for server-side encryption of files. - None: No server-side encryption. - S3 SSE (AES-256): Use Amazon-managed server-side encryption of files. - S3 KMS: Use Amazon KMS for server-side encryption of files. |
| Only Allow HTTPS? | Required | Defines whether to use HTTP or HTTPS to communicate with S3 resources. Selecting the Only Allow HTTPS? checkbox enables using HTTPS. We recommend always having Only Allow HTTPS? selected. This setting should be disabled only for testing or non-production environments. |
| Use Path-style URL | Optional | Select to use an Amazon S3 path-style URL. By default, Amazon S3 virtual-hosted-style URLs are used. Info
AWS has scheduled path-style URLs for deprecation. See the AWS Virtual hosting of buckets documentation for more information.
|
| Upload S3 Certificate | Required if Only Allow HTTPS is enabled. Otherwise optional. | Upload the certificate to use for SSL verification when communicating over HTTPS. The accepted file type is .crt. |
| Enable file service cache | Optional | Configures whether or not to cache file contents in a standalone Redis. When selected (default setting), the file cache is enabled. When not selected, the file cache is not enabled and Instabase requires permission to deploy a standalone Redis. For most installations, it’s recommended to enable this setting. The exception is if you own your own managed Redis and require Instabase to integrate with your Redis. In that case, you might need to disable this setting due to limitations surrounding Instabase deploying a standalone Redis. |
To connect to your S3 file storage:
-
In the Storage field, select S3 Storage.
-
In the S3 Server URL field, enter the URL of your Amazon S3 instance, in the following format: https://s3.[your region code].amazonaws.com.
-
If using AWS access credentials:
-
In the S3 Access Key ID field, enter the access key ID.
-
In the S3 Secret Access Key field, enter the secret key value.
-
-
In the AWS Region field, enter the region code for the AWS account, such as
us-east-2. -
In the S3 Bucket Name field, enter the name of the S3 bucket.
-
In the S3 Encryption Type field, select an encryption type.
-
Ensure Only Allow HTTPS? is selected.
-
If using a path-style URL, select Use Path Style URL.
-
Upload the certificate to use for SSL verification when communicating over HTTPS:
-
Click Upload S3 Certificate.
-
Select the .crt certificate file.
-
-
Click Next to continue to Step 4.
Connect to local file storage
Instabase supports using a network file system (NFS) as your file storage. For security reasons, however, Instabase does not support directly connecting to the NFS. You must first mount your NFS as a Kubernetes Persistent Volume Claim (PVC).
When connecting to a local file storage system, you see the following settings:
| Setting | Required | Value |
|---|---|---|
| Local Directory | Required | Defines the local mount directory. /home/ibuser/data is the most common value. |
| NFS PVC Name | Required | The name of the Persistent Volume Claim the NFS was mounted to. |
| Enable file service cache | Optional | Configures whether or not to cache file contents in a standalone Redis. When selected (default setting), the file cache is enabled. When not selected, the file cache is not enabled and Instabase requires permission to deploy a standalone Redis. For most installations, it’s recommended to enable this setting. The exception is if you own your own managed Redis and require Instabase to integrate with your Redis. In that case, you might need to disable this setting due to limitations surrounding Instabase deploying a standalone Redis. |
To connect to local file storage:
-
In the Storage field, select Local Storage.
-
In the Local Directory field, enter a file path for the local mount directory.
/home/ibuser/datais the most common value. -
In the NFS PVC Name field, enter the name of the PVC where the NFS is mounted.
-
Click Next to continue to Step 4.
Connect to Azure Blob Storage
When connecting to Azure Blob Storage, you see the following settings:
| Setting | Required | Value |
|---|---|---|
| Azure Connection String | Required | The connection string for your Azure storage account. |
| Azure Blob Storage Container Name | Required | The name of your Azure Blob Storage container. |
| Enable file service cache | Optional | Configures whether or not to cache file contents in a standalone Redis. When selected (default setting), the file cache is enabled. When not selected, the file cache is not enabled and Instabase requires permission to deploy a standalone Redis. For most installations, it’s recommended to enable this setting. The exception is if you own your own managed Redis and require Instabase to integrate with your Redis. In that case, you might need to disable this setting due to limitations surrounding Instabase deploying a standalone Redis. |
To connect to Azure Blob Storage:
-
In the Storage field, select Azure Blob Storage.
-
In the Azure Connection String field, enter the connection string.
-
In the Azure Blob Storage Container Name field, enter the name of the container.
-
Click Next to continue to Step 4.
Connect to Google Cloud Storage
When connecting to Google Cloud Storage, you see the following settings:
| Setting | Required | Value |
|---|---|---|
| Google Cloud Storage Bucket Name | Required | The name of your Google Cloud Storage bucket. |
| Upload GCS Service Account Credentials | Required | The credentials for your Google Cloud Storage service account. Upload the credentials as a .json file. |
| Enable file service cache | Optional | Configures whether or not to cache file contents in a standalone Redis. When selected (default setting), the file cache is enabled. When not selected, the file cache is not enabled and Instabase requires permission to deploy a standalone Redis. For most installations, it’s recommended to enable this setting. The exception is if you own your own managed Redis and require Instabase to integrate with your Redis. In that case, you might need to disable this setting due to limitations surrounding Instabase deploying a standalone Redis. |
To connect to Google Cloud Storage:
-
In the Storage field, select Google Cloud Storage.
-
In the Google Cloud Storage Bucket Name field, enter the name of the bucket.
-
Upload the credentials for your Google Cloud Storage service account:
-
Click Upload GCS Service Account Credentials.
-
Select the .json credentials file.
-
-
Click Next to continue to Step 4.
Step 4: Configure Kubernetes cluster settings
On this tab, you configure the connection to your Kubernetes cluster.
When connecting to your Kubernetes cluster, you see the following settings:
| Setting | Required | Value |
|---|---|---|
| Admin Username | Required | The username for your default Instabase admin credentials. You define the username value in this step and use it for initial admin access to the Instabase platform upon installation. |
| Admin Email | Required | The email for your default Instabase admin credentials. You define the email value in this step and use it for initial admin access to the Instabase platform upon installation. |
| Kubernetes Namespace | Required | The namespace of the Kubernetes cluster to install Instabase under. This is the namespace value defined in the Installation guide. |
| Image Registry | Optional | The registry to pull Instabase images from. The default value is gcr.io/instabase-public. If you don’t want to store the Docker images for Instabase services in the Instabase Google Cloud Container Registry, enter your own internal image registry URL. |
| Use Custom PVC Names | Optional | Turn on this setting to enable setting custom Persistent Volume Claim (PVC) names. This setting is optional and available if you have restrictions surrounding PVC naming. When turned on, the default PVCs are listed, with associated input fields. To rename the PVC, enter a custom name in the associated input field. |
| Cluster Size | Required | Select from the following preset cluster sizes: -Standard: 64 CPU cores/256 GB RAM -Large: 128 CPU cores/512 GB RAM -Extra large: 256 CPU cores/1024 GB RAM Select the option that meets but does not exceed your cluster size. After installation, you can manually adjust the Instabase cluster size configuration using patches to more closely match your Kubernetes cluster size. Info
Deployment Manager does not have cluster-level permissions to change cluster size; it can modify only Instabase components. Modifying your cluster size must be done from your cluster provider.
Note
Instabase release 23.07 introduces workload autoscaling as a public preview feature that’s disabled by default. Workload autoscaling lets Instabase autoscale data services based on demand rather than adhering to a set resourcing size. Autoscaling is available only for select services. To learn more about workload autoscaling, see the workload autoscaling documentation. To enable and configure workload autoscaling, follow the instructions in the 23.07 deployment guide. Be advised that workload autoscaling has several infrastructure requirements. |
To connect to your Kubernetes cluster:
-
In the Admin Username field, define an admin username.
-
In the Admin Email field, define an admin email.
-
In the Kubernetes Namespace field, enter the namespace of your Kubernetes cluster.
-
Select a cluster size.
-
Click Next.
Step 5: (Optional) Configure a SAML connection
Instabase supports security assertion markup language (SAML)-based authentication to manage access to your Instabase deployment. Using SAML-based single sign-on (SSO) lets you leverage your existing SSO identity provider (IdP) to automatically create new user accounts on the Instabase platform upon initial login. You can also optionally map existing groups configured in your IdP to groups in your Instabase deployment.
Instabase uses service provider (SP)-initiated SSO authentication and supports IdPs that use SAML 2.0.
See the SAML authentication documentation for details on app registration requirements.
You can configure a SAML connection after installation using the Installer SAML APIs.
The SAML Configuration tab contains the following settings. Settngs are required unless marked as optional.
| Setting | Required | Value |
|---|---|---|
| Auth Provider | Required | Defines how the IdP metadata XML is provided: -Local: By referencing a static metadata.xml file that is stored as a Kubernetes secret in the deployment.-Remote: By referencing a metadata-server endpoint where the XML file is hosted on the SAML provider metadata server. |
| Auth Provider URI | Required only when Auth Provider is set to Remote. | Is displayed when Auth Provider is set to Remote Defines the location of the IdP metadata XML. Enter the endpoint URL where the IdP metadata XML is hosted on the IdP metadata server. |
| SAML metadata file | Required only when Auth Provider is set to Local. | Is displayed when Auth Provider is set to Local The IdP metadata XML file. Note
When installation is finalized, a Kubernetes secret containing this metadata file is created. The secret is what is referenced during SAML authentication.
|
| HTTP ACS URL | Required | The access consumer service (ACS) URL where the IdP redirects after the user successfully authenticates, entered with an HTTPS (not HTTP) scheme. Typically https://{Your Instabase URL}/account/sso/saml2. |
| HTTPS ACS URL | Required | The access consumer service (ACS) URL where the IdP redirects after the user successfully authenticates, entered with an HTTP (not HTTPS). Typically http://{Your Instabase URL}/account/sso/saml2. |
| SP Name | Required | The label associated with the Instabase entity in the IdP. Typically InstabaseSP. |
| SP Entity ID | Required | The entity ID value set in the IdP. An exact match between this value and the entity ID set in the IdP is required. Typically {Your Instabase URL}. For example, https://dev.instabase.com. |
| Required attributes | Required | The required SAML attributes (claims) provided to Instabase by the IdP. Typically email, uid. |
| Optional attributes | Optional | The optional SAML attributes (claims) provided to Instabase by the IdP. Typically groups, if group mapping is used. |
| Allow Unsolicited | Required | For SP instances, if set to true (turned on), the SP consumes unsolicited SAML responses for which it has not sent a respective SAML authentication request. The default setting is On (true). |
| Auth Requests Signed | Required | For SP instances, indicates if the authentication requests sent by this SP should be signed by default. The default setting is Off (false). |
| Logout Requests Signed | Required | Indicates if this entity will sign the logout requests originated from it. The default setting is On (true). |
| Want Assertions Signed | Required | Indicates that the assertions contained within the response that is sent to this SP must be signed. The default setting is On (true). |
| Want Response Signed | Required | Indicates that the authentication response to this SP must be signed. The default setting is On (true). |
To configure a SAML connection:
-
On the SAML Configuration tab, turn on the Configure SAML toggle.
-
In the Auth Provider field, select a method of providing the IdP metadata XML file.
-
Provide the metadata XML file:
-
If Auth Provider URI is set to Local: Click SAML metadata file and select your IdP metadata XML file from the file explorer.
-
If Auth Provider URI is set to Remote: In the Auth Provider URI field, enter the remote metadata URL.
-
-
In the HTTP ACS URL field, enter the ACS URL with an HTTPS scheme.
-
In the HTTPS ACS URL field, enter the ACS URL with an HTTP scheme.
-
In the SP Name field, enter the SP name.
-
In the SP Entity ID field, enter the SP entity ID.
-
In the Required Attributes field, enter all required SAML attributes. Between each item, add a comma and a space, such as
attribute 1, attribute 2. -
In the Optional Attributes field, enter all optonal SAML attributes. Between each item, add a comma and a space, such as
attribute 1, attribute 2. -
Optionally adjust the default settings for the Allow Unsolicited, Auth Requests Signed, Logout Requests Signed, Want Assertions Signed, and Want Response Signed fields.
-
Click Next.
Step 6: Review and confirm your inputs
On the Confirm tab, you can review your inputs from previous tabs.
-
Review the configuration details. If you see any errors, click the related tab in the sidebar to revisit that tab’s settings.
-
If everything is correct, click Confirm to proceed to preflight checks.
Step 7: Run preflight checks
Preflight checks validate your information to assess if installation can proceed. The following checks are available:
-
Service accounts check: This check confirms the service account used by the Instabase observability monitoring services exists in the Kubernetes cluster.
-
Role-based access control (RBAC) check: This check reports back any inconsistencies between permissions the Deployment Manager service account requires and permissions it has been granted. A success message indicates the Kubernetes RBAC resource associated with the Deployment Manager service account matches the permissions Deployment Manager requires. A failure message shows the expected RBAC configuration alongside the configuration found in the cluster.
-
File storage access check: This check tests that the file system credentials entered can connect to your file storage platform. This check also verifies that Instabase has the permissions needed to perform all necessary file operations.
NoteAs of Deployment Manager 23.01, the file system check is supported for Amazon S3 and Azure Blob Storage file storage options.
-
Database check: This check tests that the database credentials entered can connect to your database. This check also verifies that Instabase has appropriately scoped permissions for table creation, table reading, and table writing.
-
Persistent Volume Claim (PVC) check: This check tests that all required PVCs are present, bound, and mountable. If you have set custom PVC names, list them when using the check.
To perform preflight checks:
-
Click Run Preflight Checks.
-
Review the results of each check.
- If each check reports back a successful result, you can proceed with installation.
- If any check reports a failure, review the error message for a description of the failure. Make any required changes in previous installation steps, or in Kubernetes, your database, or your file system. Then, revisit Instabase Installer and proceed through to the Preflight Checks tab, running the checks again until they are successful.
NoteIf one or more preflight checks fail, but you want to continue with installation without resolving, click Force Override.
-
Click Next.
In some cases, preflight checks are not available and you see a Could not fetch Preflight Checks. You may skip this step. message. Click Skip to continue to the next step of the installation process.
Step 8: Upload platform configurations
On the Platform Configuration tab, you see the following settings:
| Setting | Required | Value |
|---|---|---|
| Base Configs | Required | A zipped file of Instabase base configurations. The base configurations file, called base_configs.zip, is in the release’s installation.zip file. Supported file types are .zip, .gz, and .tgz. |
| Instabase License | Required | Your Instabase license. This file is provided by your customer success manager and is an .iblicense file. |
| Network Policies | Optional | A zipped file of network policy files. If indicated, your installation.zip package includes a folder called network-policies containing a series of network policy files. After making any necessary changes to the network policy files, compress the network-policies folder.Supported file types are .zip, .gz, and .tgz. |
| Default Patches | Required | A zipped file of patches. The default patches file, called default_patches.zip, is in the release’s installation.zip file. Supported file types are .zip, .gz, and .tgz. Note
See the Prerequisites section for instructions on how to add custom patch files to the
default_patches.zip file. Info
You can also apply patches after completing installation, from the Deployment Manager Configs tab.
|
Never directly edit the base configuration files provided by Instabase to make configuration changes. Always use the configuration management tools on the Configs and Base Configs tabs instead. See the configuration management documentation for guidance on using patches to modify your base configurations.
-
Upload the base configurations.
-
In the Base Configs field, click Upload.
-
Select the base configurations file from the file explorer.
-
-
Upload the Instabase license.
-
In the Instabase License field, click Upload.
-
Select the license file from the file explorer.
-
-
Upload the default patches file.
-
In the Default Patches field, click Upload.
-
Select the default patches file from the file explorer.
-
-
Upload network policies, if indicated.
-
Click Next.
Step 9: Finalize installation
You’re now ready to kick off the installation process on the Finalize tab.
-
Click Install. Instabase Installer begins the installation process, which can take up to ten minutes to complete. As installation continues, installation event logs appear.
-
When the success message appears, click Continue.
Step 10: Confirm successful installation
From the Deployment Manager infra dashboard, you can view the state of various components of your Kubernetes infrastructure. You can access the infra dashboard at {YOUR-INSTABASE-URL}/deployment-manager/dashboard/deployments.
Use the dashboard tabs to see which Deployments, StatefulSets, and Services have spun up and are working as expected. Items with a green checkmark are ready to use, items with a spinning icon are still spinning up, and items with a red X have encountered an error or other event. If any deployments display a red X, you can connect with Instabase Support for next steps, and provide events history and logs for the affected pods and containers. See the Troubleshooting section for instructions.
Step 11: Complete automated post-install actions
Automated post-install actions are available as of Deployment Manager 23.01. For previous versions, follow steps 4-9 of the Post Deployment Steps section of the Installation guide to complete post-install actions manually.
You can complete the following post-install actions from the Deployment Manager infra dashboard after installation finishes:
-
Base model image upload action: Downloads all Instabase base models required for running ML Studio offline training, along with numerous entity detection models, and publishes them to the Marketplace so they’re ready to use.
-
Deployed Solutions consistency action: Migrates Deployed Solutions published on releases < 23.07, to ensure compatibility with the current Instabase version.
-
License action: Applies the license uploaded to Instabase Installer.
-
ML Studio config setup action: Performs the post-deployment configuration of ML Studio using the latest version of the .ibformers training script.
-
Setup system retention rules: Sets up system-level rules used to support user-defined file retention settings (only applicable to SaaS deployments).
-
System repo setup action: Sets up backing file system infrastructure required to publish new models to the platform.
-
Test Runner setup action: Sets up a Test Runner test suite used in the Test Runner test action. The test suite includes a variety of tasks commonly performed with the Instabase platform, providing broad coverage of expected functionality. Tested functionality includes:
-
Verify solutions (including flows, flow binaries, and .ibsolutions) can successfully run end-to-end.
-
Verify a variety of common input file types can be processed successfully.
-
Assess the performance of a variety of Instabase components, including apps and services.
-
Assess the performance of a variety of OCR engines.
-
-
Test Runner test action: Runs the Test Runner test suite set up in the previous action. When complete, solution diagnostics display for each test, including a status for the test and comparison details if expected (
base_value) and actual (compare_value) solution results differ.InfoThe test suite includes tests that assess the performance of a variety of OCR engines. If your deployment does not use a given OCR engine, that test will result in an error. Connect with your customer success manager if you have any questions or concerns about a failed test.
To initiate automated post-install actions:
-
Open the Deployment Manager infra dashboard at
{YOUR-INSTABASE-URL}/deployment-manager/dashboard/deployments. -
Verify that all deployments display a green check mark.
-
Click Check post-install actions in the top-right corner.
-
Click Run All.
Deployment Manager begins running the post-install actions. Completing post-install actions can take some time; during this time, you can leave the Deployment Manager infra dashboard. To check on the progress of the post-install actions, click Check post-install actions.
To refresh the status of the post-install actions’ progress, click Refresh. When a post-install action is complete, a green checkmark displays next to the action.
If any actions fail or encounter errors, connect with your customer success manager for next steps and support.
Next steps
After installation, complete the next steps for the best experience.
Verify and configure observability toolset
All self-hosted Instabase deployments are equipped with observability tools that measure and provide visibility into the internal state of the deployment’s infrastructure and applications. The Instabase observability toolset is enabled by default when Instabase is installed. After installation, verify that your toolset is accessible and review observability configuration options such as alerting and log storage location.
To verify that your observability toolset is accessible:
-
Confirm that the following links are accessible, substituting your Instabase base URL. The login credentials for these links are shared separately:
-
Grafana:
<base_url>/grafana -
VMAgent:
<base_url>/vmagent/targets -
Alertmanager:
<base_url>/alertmanager/
-
-
Confirm that data sources are available in VMAgent by navigating to
<base_url>/vmagent/targets. -
Confirm that alerts are available in Alertmanager by confirming the presence of the placeholder
Watchdogalert on the Alerts tab. For example: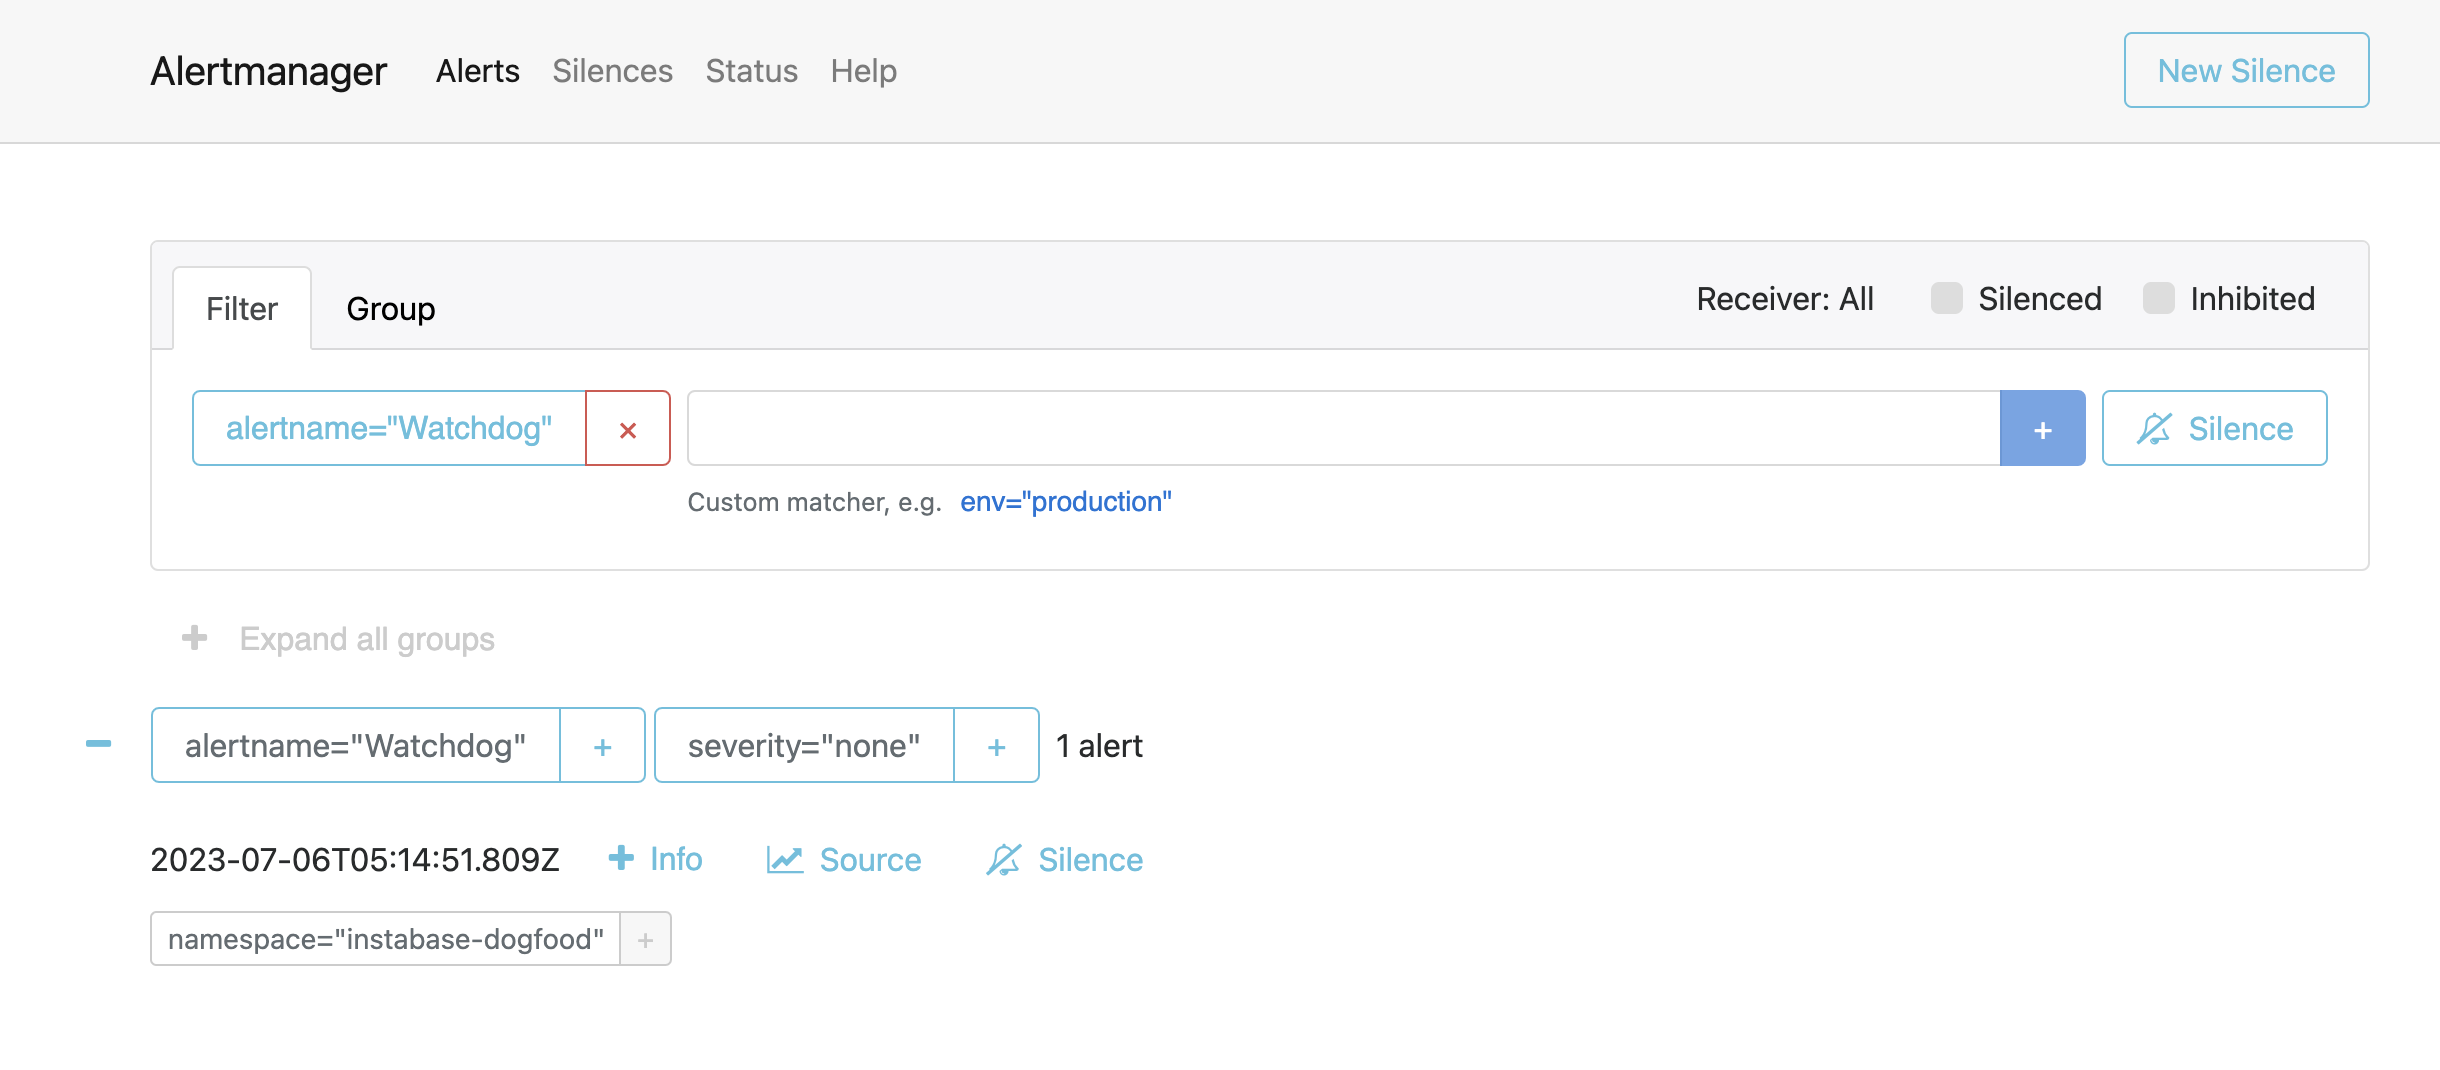
-
Confirm that data is displaying in Grafana’s dashboards. To verify that logs and traces are present, use the Explore page in Grafana.
To configure your observability toolset, including enabling alerting or managing log storage location, see the observability configuration documentation.
For any questions about validating your observability toolset after installation, including validating your Alertmanager connection, connect with your Customer Success team.
Troubleshooting
Installation failed
If you navigate away from Instabase Installer during the Finalize step, you might see an Installation failed page with the following message: Installation Failed. Something went wrong during the installation process. Click the button below to retry.
To retry installation:
-
Click Retry.
-
In the Confirm Retry dialog, click Confirm.
-
Click through every step of the installer.
-
On the Finalize tab, click Install.
InfoThe logs pane on the Finalize tab still displays logs from the failed installation attempt.
Instabase Installer retries installation and reconciles any changes to the database or cluster made during the initial installation attempt.
The infra dashboard indicates some Deployments/StatefulSets/Services have errors
From the Deployment Manager infra dashboard, you can view the status of various components of your Kubernetes infrastructure. If items on the Deployments or StatefulSets tabs encounter errors or fail during initial deployment, you can connect with Instabase Support to help diagnose the issue. Be prepared to provide events history and logs for the affected pods and containers.
To gather events history and logs:
-
Open the Deployment Manager infra dashboard at
{YOUR-INSTABASE-URL}/deployment-manager/dashboard/deployments. -
On the Deployments tab, click the name of the deployment that is encountering issues.
-
In the Pods list, click the name of the pod that is encountering issues.
-
Copy the events history from the Events section to share with support.
-
In the Containers list, click View to open the logs for any containers encountering issues.
-
Return to the Deployments tab and repeat for other deployments, as needed.
-
Click the StatefulSets tab, and repeat steps 2-6 for any items on the StatefulSets tab that are encountering issues.