Validating data
Configure validations and include them in your flow to ensure that data has been correctly extracted. You can create, configure, and edit validations in the Validations app.
You can also create and configure validations through Solution Builder. For details on configuring a validation using Solution Builder, see the Solution Builder documentation. This document assumes you are using Instabase in Classic mode. If you are using Instabase in Solution Builder mode, the interface differs somewhat.
Creating a validation module from Flow
To create and add a validation directly to a flow you’re building, create a checkpoint module in the Flow Editor.
-
Open the flow to which you want to add a validation check point.
-
In the Flow Editor’s Modules panel, click +.
-
Select Checkpoint Module.
-
Select Create new module.
-
Enter a name for the validation module and click Create.
Flow creates a checkpoint folder within the flow’s /modules directory. This folder is named <module name>.checkpoint and contains:
-
A validations file called
validations.ibvalidations, which contains the validation configuration. -
A scripts directory, containing a
validations.pyfile, which contains a register of custom Python functions that you can use in validations.
Next, you’ll configure the validation by adding rules and conditions. Open the generated .ibvalidations file to configure your validation.
Creating a validation module from the Validations app
To create a validation module to add to a flow later, you can start in the Validations app.
-
In the Validations app, select File > New Validations or click + Create New
-
Name: Enter a name for the validation module.
-
Where: Enter the file path to the location in which you want to create the
.ibvalidationsfile. The best place to put this file is usually in the checkpoint module directory, but you can put it in other locations if needed. -
Refiner Output Directory: Enter the file path to the refiner output you want to validate. The refiner output, which is output as
.ibmsgfiles, defines what fields can be configured in the validation module. -
Ground Truth Set Directory: Optional. Enter the file path to the ground truth data set on which to base this validation module. The ground truth set provides a known, accurate set of fields and values so that the validation module can compare new data. If you don’t have the ground truth set directory yet, you can add the information to the module later.
-
Custom Code Directory: Optional. Enter the path to a directory that contains a
validations.pyfile with a register of custom Python functions that you can use in validations.
Next, you’ll configure the validation by adding rules and conditions. Open the generated .ibvalidations file to configure your validation.
Configuring a validation
To configure the fields for a validation, you must associate a refiner output with the validation. Optionally, you can also provide the validation with a ground truth set, which defines correct values for fields, and a custom code path, which enables custom conditions.
You might have already provided the refiner output, ground truth set, and custom code path when you created the validation. If you did not, or if you want to change those settings, you can edit or add the refiner output, ground truth, and custom code information in the Validations app.
Associate data with a validation
The refiner output that you associate with a validation defines what fields can be validated.
The ground truth set directory and custom code directories are optional. A ground truth data set defines correct values for the fields being validated. The custom code directory contains your custom Python functions for use in the validation.
-
In the Validations app, click the settings (gear) icon to open the Edit Validations dialog.
-
In the Refiner Output Directory field, click the folder icon and locate the directory containing the refiner output. The refiner output directory must contain
.ibmsgfiles. -
Click Open folder.
-
Optional. To associate a ground truth data set with a validation, click the folder icon and select the directory containing the ground truth data set.
-
Optional. To associate a custom code path, click the folder icon and select the directory containing the custom code file. This path must be a directory containing a
validations.pyfile with a register. -
When you’ve finished associating directories with your configuration, click Close.
Configuring rules and conditions
An .ibvalidations configuration is modeled as a set of rules, each having its own set of conditions that can be combined with if/else statements. The types of conditions are:
-
Type validation: Checks whether the specified field matches the desired type and format.
-
Confidence threshold: Checks whether the specified field’s model confidence is greater than the specified confidence threshold.
-
Comparison: Checks to make sure the configured equation is True given the specified field values.
-
External code: Custom Python code to configure a condition for any number of external fields.
Each condition can affect any field found within the associated refiner output.
When the validation runs a rule, it locates the first condition and evaluates whether it passes or fails the rule.
-
If the condition passes, the rule follows the green “PASS” arrow, or
-
If the condition fails, the rule follows the red “FAIL” arrow.
The rule execution is complete when a terminal node is reached.
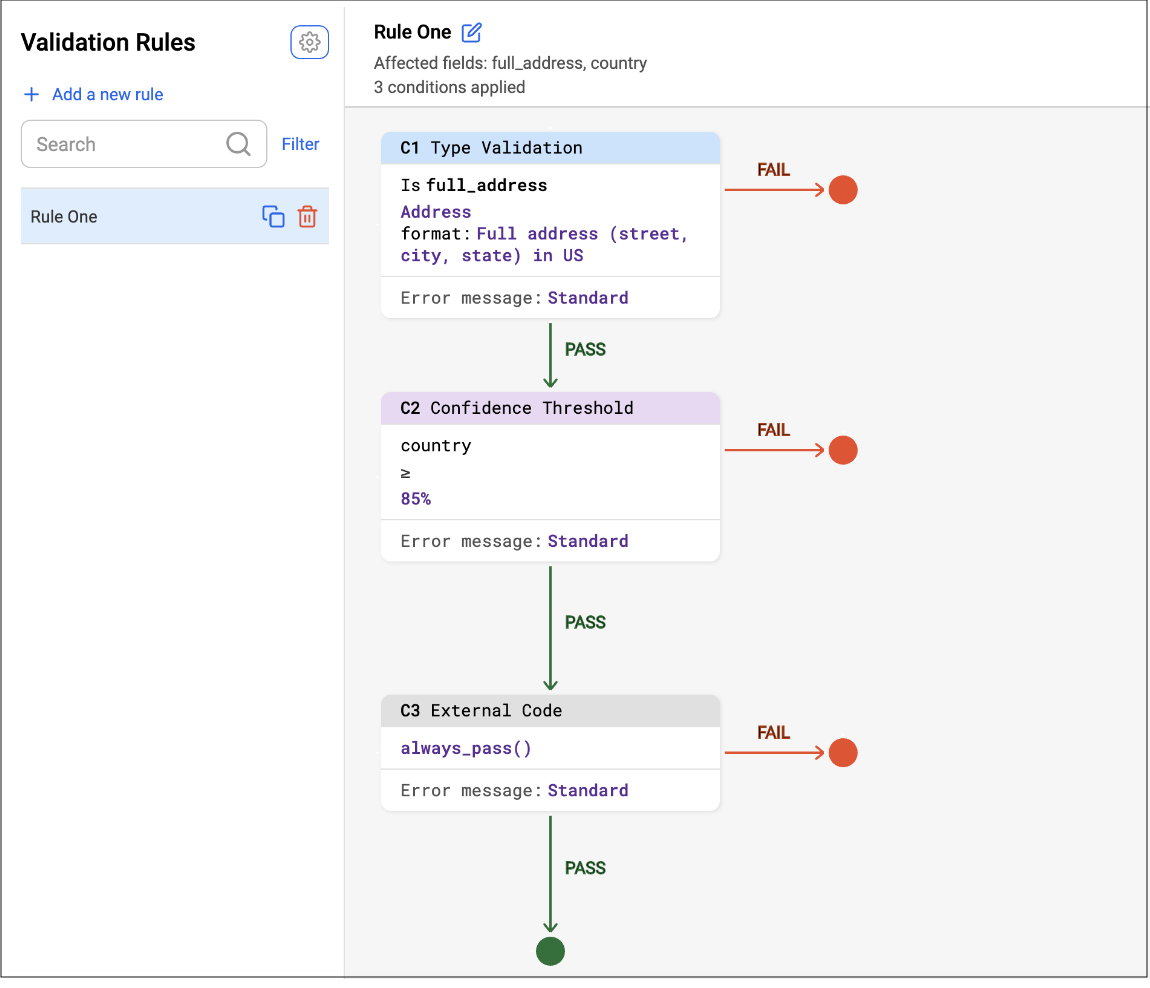
In the image, the .ibvalidations configuration consists of one rule named Rule One. Rule One consists of three conditions:
-
C1: Type Validation
-
C2: Confidence
-
C3: Custom Code.
When this rule is run, each condition is executed in order: C1, then C2, then C3. If any condition fails, the rule fails. If all conditions pass, the rule passes.
Create a rule
If you start with an empty .ibvalidations configuration, you first must add validation rules. You can also add new rules to an existing validation.
-
In the Validation Rules panel, click + Add a new rule.
-
Enter a rule name.
-
Optional. To use an existing rule as a template for the new rule, check Use a previously built rule as the template and select the rule to use as a template.
-
Click Confirm.
-
Add new conditions, detailed below, as needed.
-
To add a new condition to the rule, hover over an arrow in the rule and click the + plus icon
-
Select the condition type you want to add
-
Complete the fields to configure the condition.
When you are done adding conditions, you can test the rule by clicking Test Validation Rule.
-
Add conditions to rule
Conditions specify the kinds of checks you want validated for a given rule. A rule can contain multiple conditions, each of which passes or fails the check. If data passes every condition in the rule, it is validated for that rule.
-
In the Validations app, click + Add a new rule.
-
Enter a name for the rule.
-
Optional. Select Use a previously built rule as the template, and select a rule to use as a template.
-
Map new field to replace the fields from the original rule.
-
Click Confirm.
-
-
Click Confirm.
-
Add the first condition to the rule by clicking + Add a new condition.
-
Select a condition type and complete the fields for the condition, as detailed in Validation conditions.
-
To add more conditions, hover over an arrow in the rule that you are configuring, and click the + plus sign. In the dialog, select the condition type you want to add and complete the fields.
When you have finished adding conditions, you can test your rule by clicking Test Validation Rule.
Validation conditions
You can validate data based on type, confidence threshold, comparison, and other factors.
Type Validation condition
A type validation condition checks whether the specified field matches the desired type and format.
For each type validation condition, select:
- One affected field from the associated refiner output.
- The correct type for that field.
- The error message type to display during review.
The available types and formats include:
-
Address - Validates address details, including various elements of U.S. addresses, U.K. zip code, and country.
-
Date - Validates timestamps in various formats.
-
Dict - Validates a built-in python type that maps keys to values, for example:
{ "key1": "val1", "key2": "val2", "key3": "val3" } -
List - Validates a built-in list type, for example:
["a", "b", "c", "d"] -
Monetary - Validates currencies and amounts.
-
Name - Validates against a name tokenizer to ensure that the value has a first name and last name with no numbers or special characters.
-
Null - Validates that a null value is present.
-
Number - Validates integers or floats: real numbers.
-
Table - Validates that the value is either a 2D array, an ExtractedTable, or an ExtractedTablesList.
-
Text - Validates text strings.
Confidence Threshold condition
A Confidence condition checks whether the specified field’s model confidence is greater than the specified confidence threshold.
For the confidence threshold condition:
-
Select one affected field from the associated refiner output
-
Specify the confidence threshold cutoff as any number between 0 and 100.
-
Select the error message type to display during review.
Comparison condition
A Comparison condition checks to make sure the configured equation is true given the specified field values.
For each comparison condition, select:
-
One affected field from the associated refiner output
-
The operator to use for the comparison.
-
The equation to use for the comparison.
-
The error message type to display during review.
Available math operators are <, <=, =, >, >=.
The right-hand side (RHS) formula can be any combination of: float, integer, or monetary field names OR float or integer constants.
Available string comparison operators are =.
The right-hand side (RHS) formula can be any combination of: text field names OR string literals enclosed with double quotes. The formula supports concatenation of two strings via ‘+’ (such as “Hello” + " world.")
External Code condition
You can link custom Python code to configure a condition for any number of external fields. To configure an external code condition:
-
Select any number of affected fields from the associated refiner output.
-
Call the registered custom function with its corresponding arguments.
-
Select the error message type to display during review.
Arguments in the linked custom code can be:
-
A field name: The field’s extracted value is passed into the custom function.
-
A string literal: The string literal, enclosed with double quotes (such as “hello”), is passed into the custom function.
-
An integer or float constant: The integer or float constant, such as 5 or 8.12, is passed into the custom function.
See Writing custom functions for conditions for details.
Writing custom functions for conditions
If the default validation conditions don’t work for your data, you can create customized validation functions with exacting logic.
Functions for top-level fields
Write a custom Python function that validates a top-level field with the following signature:
def custom_fn_1(field1, field2, ..., **kwargs) -> ValidationTuple:
   // validation logic
   Return false, 'replace with an error message'
Define the ValidationTuple at the top of validations.py. The tuple is of form (bool, Text).
The custom function can take in any number of arguments, but the last argument must be **kwargs, which contains a key, _FN_CONTEXT_KEY, with information about the flow being validated. The _FN_CONTEXT_KEY key contains the following information about the flow on which the validation is run:
-
JOB_ID
-
INPUT_IBOCR_RECORD
-
INPUT_FILEPATH
-
TOKEN_FRAMEWORK_REGISTRY
-
REFINER_FNS
You can use the context information from **kwargs in a custom function by accessing _FN_CONTEXT_KEY and the specific information key you want:
fn_ctx = kwargs['_FN_CONTEXT_KEY']
job_id = fn_ctx._name_to_col_val.get('JOB_ID')
Functions for nested fields
Nested fields are defined as any field of dictionary, list, or table types. Nested fields contain internal fields “nested” within their top-level value. For example, a dictionary is composed of several key paths, a list is composed of several indices, and a table is composed of several cells. In validations, you can flag those nested internal fields as invalid by using custom functions.
To flag nested fields, you need a custom function that returns a dictionary that maps each internal field to a validation tuple. The keys of the dictionary are strings codifying the internal field that you want to flag. The string for each type must be formatted in a particular way.
Dictionary key path
For a dictionary, you might want to highlight a specific keypath of a dictionary as invalid.
For example, given the following dictionary, you might want to flag only doubleNestedField3 as invalid:
{
  "field1": "value 1",
  "field2": "value 2",
  "field3": {
    "nestedField3": {
      "doubleNestedField3": "value 3"
    }
  }
}
You could set up a custom function that maps the dictionary key doubleNestedField3 to a validation failure with an error message:
def custom_fn_1(dict1, **kwargs) -> ValidationTuple:
   // validation logic
   return {
     "dict1.field3.nestedField3.doubleNestedField3": (False, 'replace with an error message')
   }
Represent dictionary keypaths in the following format: <dict field name>.<dictionary keypath>
List index
For a list, you might want to highlight a specific index of a list as invalid.
For example, given the following list, you might want to flag only index 'b' as invalid.
[‘a’, ‘b’, ‘c’, ’d’]
You could set up a custom function that maps index 2 of list1 to a validation failure with an error message:
def custom_fn_1(list1, **kwargs) -> ValidationTuple:
   // validation logic
   return {
     "list1.2": (False, 'replace with an error message')
   }
Represent list indices in the following format: <list field name>.<list index>
Table cell
For a table, you might want to highlight a specific cell of a table as invalid. For example, given the following table, you might want to flag only George Washington’s birthdate as invalid.
| Name | DOB | Job |
|---|---|---|
| John Doe | 1/1/1950 | Chef |
| Jane Smith | 10/5/1970 | Entrepreneur |
| George Washington | 2/22/1932 | President |
You could set up our custom function that maps the cell at row 2/col 1 to a validation failure with an error message:
def custom_fn_1(table1, **kwargs) -> ValidationTuple:
   # validation logic
   return {
     "table1.0.2_2.1_1": (False, 'replace with an error message')
   }
Represent table cells in the following format: <table field name>.<table index>.<row start index>_<row end index>.<col start index>_<col end index>
How to register a custom function in validations.py
Within your custom code directory, open the validations.py file.
The Validations App can use any function that is returned within the register function of the validations.py file. Add your function to the register in the following format:
def register() -> Dict[Text, Any]:
 return {
     'always_fail': {
         'fn': always_fail
     },
     'always_pass': {
         'fn': always_pass
     },
     ...,
     'new_fn': {
       'fn': new_fn
     }
 }
How to import a custom function not defined in validations.py
Custom functions can be defined in the validations.py file or in any other Python file in the associated custom code path. No matter where the function is defined, the function must be defined within the validation.py register.
For example, if your /scripts directory has a validations.py file, which contains the register, and an fns.py file, which contains definitions for validation functions, you can import validation_fn_1 from fns.py with a Python import line at the top of validations.py.
from ib.custom.fns import validation_fn_1
You can then register the imported function by adding it to the register file in validations.py:
def register() -> Dict[Text, Any]:
  return {
    always_fail': {
      'fn': always_fail
    },
    'always_pass': {
      'fn': always_pass
    },
    ...,
    'new_fn': {
      'fn': new_fn
    }
  }