Text extraction with Refiner
Instabase’s Refiner App helps you “refine” (or “extract”) specific data from similar documents.
Instabase helps you create formulas to extract fields in a set of similar documents.
Prerequisites
This guide assumes that you’ve completed the guide for Instabase Flow. It assumes understanding of previous keywords, file extensions, and core Instabase concepts.
1. Setting up your workspace
First, set up a new Refiner workspace. If you made mistakes in the previous guide, this allows you to start from a clean slate.
Activity
-
Create a new workspace called
refiner-function-practice. Remove any starter folders. -
Select New > New Project > Refiner 5 Lesson. Select “Lesson 1 - Extracting Text” and name your project.
-
From
viewme.ibrecipebook, in the Practice refining fields section, select Edit Refiner program. This is where we’ll spend most of our time.
2. A brief UI tour
The Refiner view has the list of documents in the left-hand panel, an image display in the center, and the list of extracted fields on the right.
Clicking different document names on the left-hand panel brings up their image in the center of the app. The text results from OCR can be seen by toggling the T icon above the image display. In the text view, we can highlight and copy text, just like we would with a static text document. We cannot alter the text.
When we add a field in the right panel, we can give it a descriptive name like employee_name or period_beginning and a type of extraction we want to do. Then, we can use the bottom pane of the program to edit and test each field. In this bottom pane, we can also add a description of the field, if the variable name is not enough. For example, for period_beginning, we could add The start date of this paystub's pay period.
A paystub sheet overview
For this activity, the Refiner app is populated with the ADP paystubs that we added previously.
In this guide, we will add some fields to extract in the right-hand panel.
Activity
-
Open fake_adp_1.png. Change to text view and look at the resulting text. Notice how the structure of the document is preserved with whitespace.
-
In the right-hand column, hover over the
example_functionfield and select the Trashcan icon to delete it. -
In the right-hand column, select + New Field to add a new text field.
-
From the bottom pane, you can edit, rename, and test fields. Try changing the value of Field name from
field_1togreeting. -
In the text field on the left side of the bottom pane, type
echo('hello'). Notice that the right side of the bottom pane updates with relevant function documentation.echois a standard function that simply means “write” or “post”.'hello'(in single quotes—double will error), is just a value (argument) that we’re askingechoto post. -
Add another field. Give it the label
greeting2. Give this one the formulaecho(INPUT_COL). This time,INPUT_COLis our argument.INPUT_COLis a variable, which represents the data found in each document. -
Add another field. Give it the label
greeting3. Typeecho(Input_Col). This will error out when we run this function later, reminding you that variables are case-sensitive! -
Add another field. Give it the label
greeting4. Typeecho(greeting). In Refiner, you can refer to fields that are above the field you are defining. What do you think it’ll post? This reinforces how valuable it is to actually update your column names to reflect their content. -
In the top-right corner of the page, select Save and then select Run All.
-
Scroll through the data displayed in the left-hand pane, which now includes values for the fields you just defined, as generated by each field’s function. Do the values match your expectations?
3. Scan functions
Refiner has a collection of functions called Scan Functions.
This family of functions are all ways of performing the same basic actions:
-
Finding a coordinate on the page, and…
-
Returning some other region of the page relative to that coordinate
For example:
-
scan_rightfinds text and returns everything after it -
scan_belowfinds text and returns everything below it
Scan function gotchas
Activity
-
Add a new field labeled
period_beginning, with this function (remember to use single quotation marks!):scan_right(INPUT_COL, 'Period Beginning:')As you can see, this function takes two arguments. First,
INPUT_COL, which is our paystub data. This input is a given for most scan functions. Second, to narrow the result, we’re looking for everything to the right of “Period Beginning:”. -
While the
period_beginningfield is still selected, select Run Field and look at the output. The output for these documents looks clean, but other documents might produce output with extra spaces before or after the date we’re interested in. We can get rid of those spaces by selecting theperiod_beginningfield in the right pane, clicking Output in the bottom pane, and checking Clean excess spaces .
Check out the Output Table in the left pane to see the results from all the documents. For some documents, the period_beginning field might not have returned anything at all! We’ll resolve that in the next activity.
Activity
-
Edit the function of your
period_beginningfield to:scan_right(INPUT_COL, 'Period Beginning:', e=1) -
Re-run the field and observe that any missing values have appeared.
Many scan functions support the
eargument that specifies an error tolerance. Adding the argumente=1specifies that we can tolerate up to one error. In this example, we’re looking for “Period Beginning:”, but if the field returns “Period Beginning” without the colon, then that single error is permitted.You might not have realized it, but our text search is invariant of whitespace. The search query
Pay Datematches the string:Pay Date
This error tolerance is a useful feature to address the difficulty of normalizing spacing calculations across scanned documents of different resolutions and font sizes.
Next to the formula editor, we can see the documentation of the function we’re writing to remind us what parameters, like e, we can add to our scan functions. More in-depth documentation can be found by going to Help > Documentation in the header bar of the app.
Scan below
scan_below is similar to scan_right, but with a few variations.
Activity
- Create a new field called
name. Use the formulascan_below(INPUT_COL, 'Pay Date', num_lines=1). - Run the program. The output looks incredibly clipped in your results. For this example, only a single character is returned for each output.
- Change that
scan_belowcall to the following:This will increase our search output to include multiple lines, and widen the search.scan_below(INPUT_COL, 'Pay Date', num_lines=2, right_pad=30) - Enable the
Clean excess spacesoption to filter out the white space, and run again.
To increase the amount of text our function extracts, we told it to look at 2 lines instead of 1, and to look farther to the right. This does return more text, but feels clumsy. To be more precise, you must first expand your mental model in the next section.
4. Refiner - a mental model
Pretend you are in primary school. Your document is a piece of paper, and Refiner is a pair of craft scissors. Each field you want to extract involves making cuts to winnow the paper down to just the part you want. Sometimes, multiple cuts are easiest.
That basic mental model of paper and scissors will serve you well when visualizing your work in Refiner. Let’s construct an example to further cement this mindset.
Say you wanted to extract a person’s Social Security Tax amount field from their paystub. At first, your instinct might be to apply some complicated regular expression (which would also work!). However, there is a more robust approach. We can use an approach that leverages the spatial results from the OCR by thinking of the document like this:
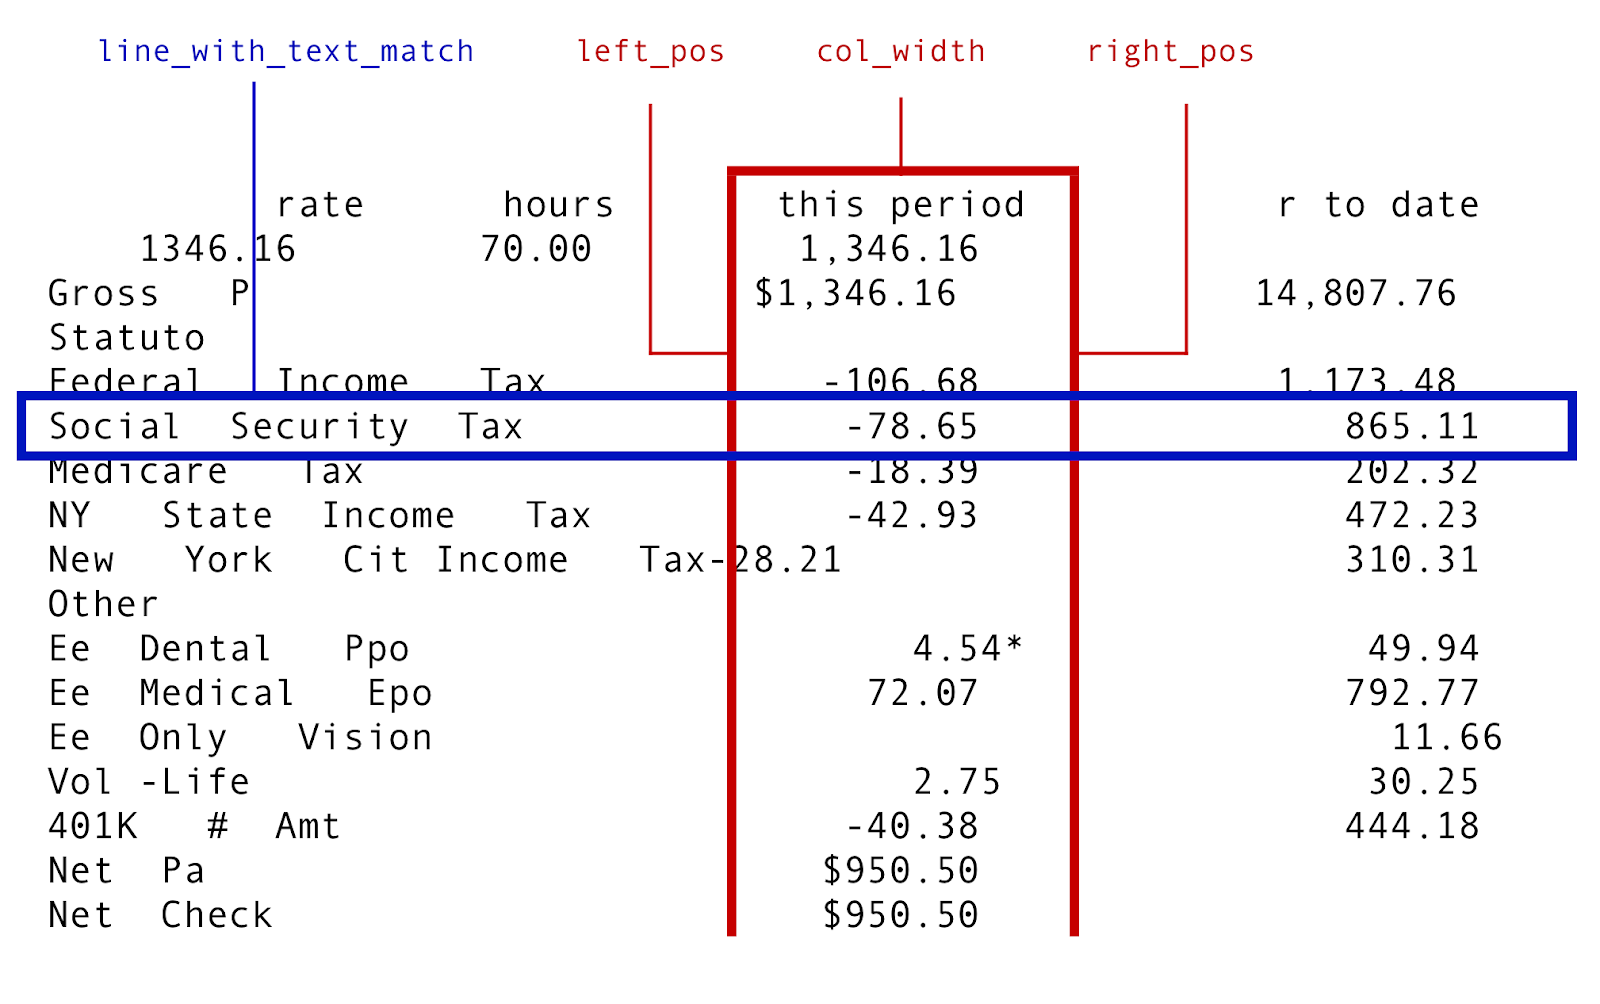
On the one hand, we want to retrieve a row of text based on some search string (“Social Security Tax”). On the other hand, we want to intersect this row of text against the boundaries of the column that has “this period” as its column header.
In other words, we want to turn the lines in the image above into real figures.
Cutting up our paystubs
To reproduce something similar to the above, let’s cut our documents up into a few pieces.
Activity
-
Create a new field called
col_padthat evaluates the functionecho(2). Think of this as a constant with value2, which we can use for padding in future functions. -
Create a new field called
col_leftthat evaluates this function:left_pos(INPUT_COL, 'this period') - col_padThis field establishes the column width on the left side, with padding accounted for.
-
Create a new field called
col_rightthat evaluates this function:right_pos(INPUT_COL, 'this period') + col_padThis establishes the column width on the right side, again accounting for padding.
-
Create a new field called
social_taxthat evalutes this function:scan(INPUT_COL, 'Social Security', left_pos=col_left, right_pos=col_right, num_lines=1)Make sure it cleans excess spaces!
This function puts into practice everything we’ve learned so far. Using
scanas our main function, we provide all the scissor cuts needed to break our paystub into the piece we’re looking for: social security tax. -
After the new field is created, select Run All to run all the functions in order, including the function that extracts the social security tax. Does it output the expected value for each document?
5. Refiner outputs
When you’re satisfied with the formulas you’ve created and their outputs, the last step is to share your distilled data.
From formulas to CSV
-
From your Refiner file (that’s
refiner.ibrefiner), select the Save button in the top right of the page. -
In the left navigation dock, select the Explorer icon, then navigate to your
refiner-function-practiceworkspace. Return to yourviewme.ibrecipebookfile. Click Run Flow. -
In the Flow view, select Tools > Run
-
Set the folder called
inputto be your “Input Folder”, then select Run. -
Your completed extraction can be found in
out/s4_merge_files/out.ibocr. Here, you can view your extracted data within Instabase. -
To share your extraction as a csv, select Export all to create a new file in
out/s4_merge_files/out.ibocr.csv.
Conclusion
That’s it! You now have a better sense of how to refine the data you’ve extracted.
If not, reach out to us at training@instabase.com. We’d love to chat about any questions, comments, or concerns that you might’ve had in completing this guide.